Tuesday, February 16, 2010

Flowers challenge at Practical Scrappers

This weeks challenge at Practical Scrappers is to use flowers! I'm really sick, but wanted to quickly share two projects where I have used flowers.......

For my layout I punched out several flowers and added them around my journaling....

For my card, I added a crochet flower that I had accidentally made while trying to make a round dish cloth. lol I really messed up following the directions, but ended up with this and I knew that I had to use it on a card or layout. Silly, I know, but I think it looks kinda cute!

I hope you all are doing well......I started feeling sick yesterday and it hit me fast and hard. I tried to get some sleep tonight but just couldn't, so here I sit at 1:38 a.m. Ugh......I hate bad, head colds! Take care........ :-)

Monday, February 15, 2010

Card Sketch at Practical Scrappers

Here is this weeks card sketch at Practical Scrappers!

And here is what I did with it......

I stamped the title and colored it in w/ a blender pen and markers. I hand-cut the hearts from some scraps of felt and then did a simple stitch around the edges with brown DMC floss. Kinda fun, huh? lol I think I'll try making some other shapes from felt, too.....like flowers!

We would love for you to play along and show us your creations using this sketch, so be sure to go to Practical Scrappers and post a link to your card on the Mr. Blinkie for this weeks card sketch.....you will have to scroll down a bit to get there!

Wednesday, February 10, 2010

Bake Sale Madness - Valentine's edition - pt 3


Here is the last thing that I made for the bake sale this past weekend. Cookie Pops. These were A LOT of work! lol It took me 3 days to finish these. I made the cookies one day, decorated them the next, then packaged them on the third. These cookies need a full day to sit after the glaze has been put on them. The glace icing needs plenty of time to dry, especially if you are going to package them in bags, like I did. But, WOW!!!! Oh my gosh! These are the cookies that I drool over whenever I go to our local bakery. I always buy an iced sugar cookie. ALWAYS! lol And, now I know how to make them. It's all in the icing, I tell ya. That's what really makes these cookies taste so awesome!

I used the recipes and instructions from the Our Best Bites website. I have to tell you that this recipe site is AWESOME!!!! Be sure to sign up to get their updates! The recipes and ideas shared here are the best!

Here are the links for you:

Valentine Sugar Cookie Pops Tutorial
Sugar Cookie Recipe
Glace Recipe and Tutorial

The biggest struggle that I had with making these is PATIENCE! lol I don't have much. Actually, my Mom has always told me that I inherited all of my patience from my dad and he didn't have any. lol But, you have to be patient with the icing, make sure it's set well, etc. I wasn't patient. I went around each heart with the thicker icing and didn't wait long enough for that outline to dry well. So, when I went to fill in the cookie w/ the thinner icing, it all ran off of the edges. At first I was really upset, but then I decided to just go with it and I started drizzling pink and red icing all over the cookies and off the edges, instead of trying to have the icing perfectly on top of each cookie. The other thing that I will do next time, is to use two colors that have a high contrast in them. I used pink and red and they looked pretty, but the two colors we so similar, the cookies just didn't pop like I wanted them to. While I used up some extra icing that wasn't colored, I covered the cookies in white and then drizzled red icing on top. Now that really popped and looks so awesome!!! You can see them in the bottom left corner in the picture above. You also need space for these to sit out and dry. I am lucky enough to have a long counter top in my kitchen, because those cookies were sitting out for quiet awhile!

My kids are begging me to make more of these, because I only save a few for us to try. The rest went to the sale. They didn't like that very well! lol St. Patrick's Day is coming up........I just might have to make some shamrock cookies w/ glace icing! I hope you try these.....they really are YUMMY!!!!!!


Bake Sale Madness - Valentine's edition - pt 2

How fun are these? This is another goodie that I made for the bake sale and perfect for Valentine's Day!

I found that the easiest way to press each layer into the pan was to lay a piece of wax paper on top of each mixture and then press. That way the cereal/marshmallow mixture doesn't stick to your hands. I tried buttering my hands and that didn't work as well as using wax paper.

Neapolitan Krispie Bars-

1 pkg (10 oz) large marshmallows - I just divided them up evenly into 3 piles
3 Tlbs. butter, divided
2 cups Cocoa Krispies cereal
1/2 cup miniature semisweet chocolate chips
4 cups Rice Krispies cereal, divided
1/2 cup strawberry jam
5 drops red food coloring, optional

In a large saucepan, combine a third of the marshmallows and 1 Tlbs. butter. cook and stir over medium-low heat until melted. Remove from the heat; stir in Cocoa Krispies and chocolate chips. Press into a greased 11x7 inch dish.

In a large saucepan, combine a third of the marshmallows and 1 Tlbs. butter. Cook and stir over medium-low heat until melted. Remove from the heat; stir in 2 cups of the Rice Krispies. Press into dish over chocolate layer.

In a large saucepan, combine remaining marshmallows and 1 Tlbs. butter. Cook and stir over medium-low heat until melted. Remove from heat; stir in jam and food coloring. Stir in 2 cups Rice Krispie cereal. Press into the dish. Cool. Cut into bars.

Here is how I packaged them up for the bake sale. I placed each bar on top of a square of wax paper before placing them in the bag.
Yummy!!!!


Valentine's Day Card - crystal glaze hearts

Well, this photo sure doesn't do this card justice. lol I had actually stamped these hearts to use on the card with the colored brads, but it just wasn't working out how I wanted it to, so I set them aside and ended up with that card done totally different then I had planned. I really didn't like how these stamped hearts looked. My ink is starting to get a little dry and they just weren't rich, red hearts like I wanted. But, I just can't throw anything away! Yes, I have it that bad. I was determined to use those hearts because there was no way I was going to toss them. So, I ended up getting my markers out and I went to work coloring. I rubbed the brush tip of my marker on one of my acrylic blocks for my unmounted stamps. Then, I took my blender pen and picked up some ink and colored in the white areas in each heart. After that, I went around the edges with red and tried to shade the bottom of each heart in a bit. For some reason, I decided to cover each heart with some crystal glaze to make them stand out a bit. And, since I've been a glitter freak lately, I sprinkled each heart with some fine glitter. Like I said, this photo does not do this card justice! It's hard to see the areas that I colored in and the glaze looks cloudy. We actually have sunshine coming in our windows today and it's causing quite a glare on my hearts! I can't complain either because we have had almost no sunshine since the beginning December. All of these cloudy, gloomy days have really gotten me down. It is so wonderful to see blue skies right now!


Valentine's Day Card - coloring your brads

Here's a card that I made for the brad challenge at Practical Scrappers. It's funny, because this card isn't anything like what my original idea was! I actually used the images that I had stamped for this card to make another card with. Crazy how that happens! lol

I have some alcohol inks that I hadn't ever used and I honestly don't know anything about them or all that they can do. But, I wanted to color my brads red! My embossing gun broke, so I couldn't cover them w/ embossing powder......I tapped them in some red Ancient Page ink, but I didn't know if that would every dry.....so then I remembered my alcohol inks! Luckily, I had some red, so I put a couple of drops on a metal lid and dipped the tops of the brads in the ink until they were covered. Then I stuck the ends in a piece of thick foam and let them dry over-night. I was so happy that it worked! lol Like I said, I don't know a think about all that these inks can do and I'm sure that a lot of you already knew that this would work. I really need to do some research on these, because I know that they are a great tool just sitting in my drawer unused. The stamped image is colored in with my Stampin'Up! markers and a blender pen.

An easy card for one of my special Valentine's!!!!! ;-)


Bake Sale Madness - Valentine's edition - pt 1

Those of you who have been visiting me since October might remember my crazy bake sale frenzy. lol If not, be sure to go here to read (and see!) all about it here and here. ;-) Well, I did it again. I guess I need to just come out and say it. I'm a bake sale over-achiever. lol I just can't help it. The sale was being held to help my daughter's 8th grade class raise money for the gift that they will be giving to their school/church. So, this is a big thing and I wanted to help out as much as I could.....lol I can bake. So, boy did I ever bake! So, here we go w/ Part 1 of my Valentine edition of bake sale madness!!!!


Candy Cane Pops


I have two things to say about these. EASY and DARLING!!!!!! Oh my gosh. These were SO EASY!!!! I wish that I had more candy canes, but I only had enough stashed away to make about 14 of these. I had hidden a box of mini candy canes back in December and had forgotten about them. My little Gracie LOVES them, so I had to keep them out of her site or she would have been wanting one all of the time! lol I can tell you for sure that I will not forget about this recipe when December rolls around. I am planning on buying boxes and boxes of mini candy canes so that I can make tons of these. You could even use Christmas sprinkles and decorate them as Christmas treats! I just LOVE these!!!!! You can find out how to make them at the Pleasant Home site. I accidentally found this blog and I am in total love with it already!

So, this was the easiest thing that I made for this round of bake sale madness.....now on to Part 2! Stay with me! It keeps getting yummier and yummier!!!!


Crochet Valentine Envelope

So how totally cute is this????? I made this the other night while my cookies were baking in the oven..... It is so easy and SO CUTE! You can find the free pattern at Lion Brand Yarn. You do need to be a member to see their free patterns. Just search under "envelope" and you'll see this pattern. Like I said, it's super easy! I have mine sitting on my table right now on top of a Valentine's table runner. I think it would look cute with some vintage Valentine's stuffed inside or even some flowers...... I'm new to following patterns and I didn't have any problems. I did have to look up a stitch or two when making the heart, but they have a wonderful learning center on the Lion Brand Yarns site as well!

These would be fun to fill with goodies for your children, a special friend, co-worker or even a teacher! Too sweet!!!! I just love Valentine's Day! ;-)


Tuesday, February 9, 2010

Easy-Peasy Valentines

I wanted to share these super-easy, home-made Valentine's with you. I absolutely LOVE Valentine's Day. Well, I love all of the fun, crafty ideas out there, the reds, the pinks.....everything! lol I am so amazed w/ all of the fun projects that people are sharing all over the web. I wish that I had all of the time in the world to make them all! But, for now, I'm trying to save them and file them away in my Valentine's Day folder.

All that I did for these Valentine's was to measure the size of the wooden block that the stamp is on and I used this as my guide for cutting the card stock that the image will be stamped on. Then, I cut a mat out for each piece of card stock in red. Each image was stamped in black ink and then I used my set of Stampin' Up! chalks and a blender pen to color the images in. I have finally caved and I have started buying Copic markers and I had two shades of green, so I used them to color in the alligator. I have no idea how to use my new markers, but I fun playing with them and I'm anxious to learn all about how to properly shade. But, for now, it's okay for this fun, little alligator! I have to admit that I can do a pretty good job at shading with my set of Stampin' Up! markers and a blender pen.....and I probably really don't NEED to buy Copic markers.....but....(there's always a "but" isn't there? lol)....my 13 year old daughter is an amazing artist and she has been using my set of SU! markers. She almost always has them with her, so I guess it's time to let her use them and I'll start buying Copics here and there. So, that's how I'm justifying that. lol
Anyway. lol After I colored the images in, I adhered the colored image onto the red, card stock mat and then I used a medium-sized hole punch to punch out two holes for the sucker to slip through. Oh, before adding the sucker, I used a stamp that came with this set on the back that says, "Happy Valentine's Day! To:____________ From:_____________" This is an old Stampin'Up! set called "Animal Valentine's" that I bought years ago. I'm not sure if they still carry it in their catalog, but they might!

My daughter helped me make these one year to pass out to her class on Valentine's Day. She was in second grade and had a lot of fun coloring them it and putting the suckers on them. So, this would be a great project for your little ones!


Brad challenge at Practical Scrappers

This weeks challenge at Practical Scrappers is to use brads! I had so many ideas running around in my head on how to use them for some samples, but I just didn't have the time this past week to work on much of anything crafty related. I did get one layout done, that I'm sharing with you today.

For my layout I put a brad in the top two corners of the patterned paper and then holding a strip of fabric on that's at the bottom edge of the patterned paper. I knew that I had to pep those brads up a bit, so I ended up putting a small, blue rhinestone on top of each brad to give them a bit a razzle-dazzle. lol This is a super-simple layout of my little Gracie when she had her first cold. She looked so pitiful. And, now that I'm sitting here looking at this layout, I forgot to add my journaling! I told you it's been a crazy week! lol Guess I had better go do that!
Please be sure to visit Practical Scrappers to see all of the amazing projects that are being posted by the design team and the wonderful people who submit their creations with Mr. Linky. All of the inspiration there is absolutely amazing! And please join in on the fun, too, and share your creations using brads this week!


Tuesday, February 2, 2010

Die-Cut Challenge @ Practical Scrappers

Here is a card that I made for this weeks challenge at Practical Scrappers to use your die-cut machine or store-bought die-cuts. I used 3 different Cuttlebug dies and added some small rhinestones in the center of some of the flowers to jazz it up a bit. lol I stamped the phrase in black ink and then went over it with a light pink marker and blender pen.
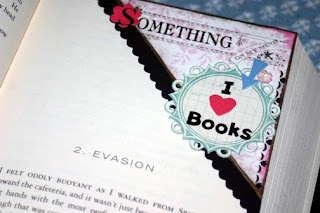
I also made this bookmark that's created using the corner of an envelope. I have been wanting to share this idea for awhile, so I went ahead and did up a tutorial for you all. You can find it in the post below this one or just click here. I used a paisley die from Cuttlebug and cut out three colors of cardstock. Then, I mixed and matched the pieces to make colorful paisleys to decorate my bookmark.

I have more to share, but I'm buried under tons of Girl Scout Cookie paperwork right now! lol I need to be working on it, but I keep getting distracted by sharing new projects here and working on layouts. That's not good! So, off I go......time to work.....it's just 12:50 a.m.....eek. It's going to be a long night!


Monday, February 1, 2010

Envelope Bookmark w/ Tutorial


Something on my mind....I -heart- Books
I've been wanting to share with you how to make these super-easy and totally fun bookmarks for quite awhile now. I made one for this weeks challenge at Practical Scrappers (which is using a die-cut machine of any type) so I decided to take pictures as I went along making it and now I can finally show you how to make them!
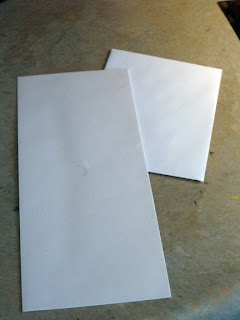
The base of the bookmark is made from the corner of an envelope. You can use any size, I have a business-sized envelope and a card-sized envelope pictured above. You can use regular-sized envelopes as well, but your bookmark will be smaller. These work the best if you know that you'll be using your bookmark in a small, paperback book. So, you might want to think about what size you need (how big or small your books are) before you start. For my bookmark, I used a business-size envelope.
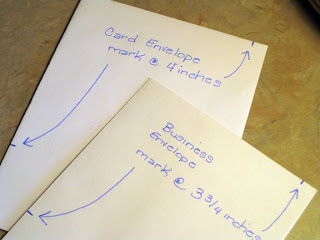
Seal the envelope first. Then, make a cutting mark with pencil as shown above:

*business-size envelope mark at 3 3/4 inches at the top and at one side

*card-size envelope mark at 4 inches at the top and at one side

I'm sorry, I don't have the measurement if you use a regular envelope. Just measure the envelope and see how tall it is and make your marks about 1/8-1/4-inch smaller than your measurement.
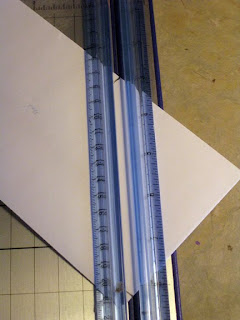
Place the envelope in your paper cutter so that you can see the cutting mark lines. Center the lines in the center of your paper cutter and then cut the envelope. If you don't want to use a paper cutter or don't have one, simply draw a line from one pencil mark to the next and then cut. You can also draw the line and then cut it with your paper cutter. This helps if it's hard for you to see exactly where you need to cut your envelope.
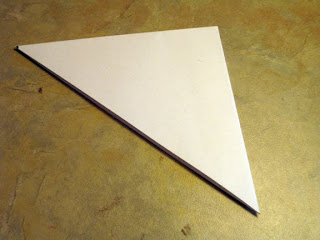
You will end up with a triangle, that has one open side, like a pocket. I forgot to mention that you can sometimes make two bookmarks from one envelope, if it's long enough to cut the corners off of each side! This would also be a great recycling project. You could use junk mail envelopes, because we will be covering the envelope with paper and that would hide any printing, etc.
The next thing that I did was to figure out how I wanted to decorate my bookmark. You can do this first, of course, but I usually get my bookmark base done first and then I start pulling out things that I think I might want to use to decorate my bookmark with. Sometimes I already have an idea, but a lot of times I don't. This time I didn't, except that I knew I needed to use a die-cut for the Practical Scrappers Challenge and I was leaning towards using my paisley one. So, I pulled out my sticker binder first and started flipping through it. I knew that I wanted a word of some kind on there and I found this sticker w/ a Bible verse on it. I liked that it was about "hope" because I really need to be putting my hope and faith in God better, so that's when the rest of it came together. I started going through my paper scraps and found the paper (one pattern for the front and one for the back), then I went through my blue color drawer and found some paint swatches. I liked this one because the name of the paint was "Inner Harbor" and I thought that was pretty fitting for a bookmark about hope.....God is my Inner Harbor. Whatever you decide on, just be sure to think FLAT. You don't want to use buttons, brads, eyelets, Prima flowers, etc., because this will be too thick. You want you bookmark to be flat so that it lays nicely in your book and doesn't blemish or mark the pages of your book.
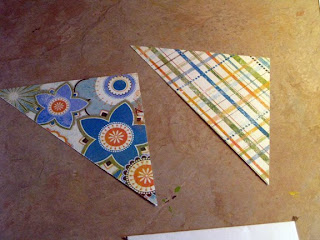
Next you need to cut your patterned paper to cover the base with. You can either measure it like you did above for the envelope, or place your base on the corner of the patterned paper and use it as a template to mark the patterned paper. Cut one triangle from each piece of patterned paper, or two of the same.....or just one for the front. You don't have to cover the back really, unless you want to! lol Adhere the patterned paper to the front and back (or just front) of the bookmark base. I use a glue runner and I run the glue all the way around all three sides, as close to the edge as I can. I don't like the paper to gap between the patterned paper and the envelope base, if that makes any sense. It also keeps it nice and smooth and stays together better....helps keep the edges nice and flat.

For this bookmark, I cut a piece of the patterned paper that I was using for the back that was about 1/2-inch thick and then cut along one edge with some scallop deco scissors. I then put it on the side of the triangle where the opening pocket is. Then, I turned it over and trimmed off the excess.

So, here is my finished bookmark. I really love how this one turned out!
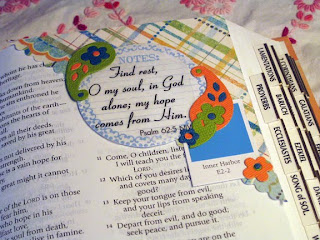
Find Rest, my soul, in God alone; my hope comes from Him. - Psalm 62:5

And here are some other bookmarks that I have made as some more inspiration for you!
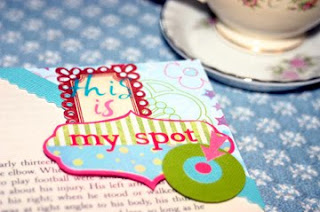
This is my spot
I made this one for my 13 year old daughter who has her nose in a book as much as I do....all of the time! lol
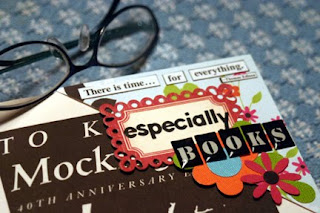
There is a time....for everything (Thomas Edison)
especially BOOKS

I hope you enjoyed this tutorial and that it all made sense! If you have any questions, please ask! I'll do my best to help! And, if you make one of these bookmarks, I would LOVE to see them! Share you link in a comment here!

Take care my friends and happy crafting!

some fun projects to share

It has been so cold this winter and that means a freezing, cold mudroom for me. My scrapping area is in my mudroom and it's on a cement block. Can you say "Freezing Floor!"? lol Not to mention just freezing in there anyway. So, in order for me to not totally lose my mind (because I am one of those people who has to be creating something at all times or I go bonkers!) I've been crocheting up these way-cute wash cloths! I found the instructions at the design*sponge blog. I have made A LOT of them now and they are perfect because they are easy, fast and something that I can do while sitting on the floor while my little one plays. I even keep one in a small bag in my purse to work on while waiting in the parking lot for after-school pick-up or while GG is playing at the play area in the mall. Working on these little wash cloths have save my sanity this winter, because it's just been too cold to spend a lot of time in my scrap room working. And, these wash cloths are AWESOME to use! I absolutely LOVE mine! I have been using cotton dish cloths for awhile now that I bought from the store, but these are so much better. I switch them out every night, so that I have a clean one to use each day. My only suggestion would be to use a light-colored yarn. The first ones that I made were red and they bled in my dish water. These are made from 100% cotton so they do shrink a little and I have noticed the color fading a bit in the ones pictured here. Actually, the one on top is brand new and hasn't been washed. The rest have and you can tell that they are faded out some.
The other project that I did was this coffee cup cozy. This was my first, official knitting project! Oh my gosh. I can't tell you how hard it was for me to learn how to knit! I am totally left-handed and knitting and lefties just don't get a long. I tried and tried and tried, and just about pulled my hair out several times. I didn't have a problem understanding what I needed to do to make each stitch. My problem was getting my hands and fingers to do what they were supposed to do. It was awful! lol A friend suggested learning the "continental method" where you hold the yarn in your left hand. I found this book called "10-20-30 Minutes to Learn to Knit" by Leisure Arts at Joann Fabrics and got it because it shows how to do this method as well as the double-cast on, which I have read in several different places, is the best way to cast on your first stitches.
I found the pattern for this at Hobby Lobby in their yarn section. It was a free pamphlet from Bernat. You do have to be a member to view the pattern, but their membership is free and if you like to knit and/or crochet, they have a ton of wonderful (and free!) patterns there. This one uses their natural felting wool. It was really fun to work with. It's soft and fuzzy. lol After you finish the knitting, you have to wash it several times and let it dry to get the wool to felt. I did learn that it's a lot harder to felt wool in a high-efficiency washer because it doesn't get agitated enough to felt the wool well. So, mine isn't as felted as I would like, but I still LOVE my cozy. I keep it in my purse, so that I always have it with me. This was a great project for me to learn from, because it taught me how to knit, purl and increase.

If you make some wash cloths or a coffee cozy, please share! I'd love to see what you've created! Now I'm off to start a new cozy.....a surprise gift for a good friend and fellow coffee-lover! Happy Crafting!


Join me for some Sweet Talking!!!!

We’re kicking off a month-long challenge at one of my favorite sites today … the Sweet Talk Journaling Challenge at Log Your Memory!


I hope you’ll come on over and check it out today … there will be an entire month of scrapbooking challenges with a focus on “real life” journaling, plus the chance to earn points and prizes along the way! And if you’ve never visited before, you’re in for a treat! We have a wonderful group of friendly, helpful scrapbookers just waiting to say hello and show you around!

Get started by visiting the Log Your Memory Blog HERE and get ready to journal your way to becoming a Log Your Memory Sweet Talker!

And be sure to tell them that Dianne sent you!