Monday, November 30, 2009

Covered Jelly Jar

Here is a fun and easy project for jazzing up your homemade jars of jam and jelly for Christmas gift-giving! At Practical Scrappers, they will be sharing a new Christmas project EVERY DAY, so be sure to visit often so that you don't miss all of the amazing things that will be shared there until Christmas!

We went to a local apple orchard in August and came home with a huge bag of Gala apples. I made apple butter and cinnamon-apple jelly and I thought that they would make super gifts for my neighbors this year. So, I decided to make some fabric jar covers to turn them in to festive gifts!
For this project I used a piece of fabric from my fabric stash basket and some ball-edge trim. I bought a yard of the trim, because it was only $.45 a yard.
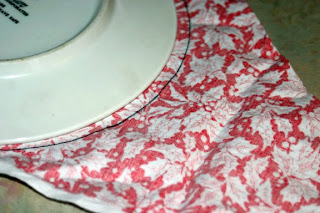
I used a saucer to trace a circle onto the fabric. I just used an ink pen to trace with. Then, I cut the circle out and sewed on the trim. I did not turn the edges down on the fabric. I guess it would have made the back side look cleaner if I did that, but I am hoping that no one will turn this over and inspect it and say, "Wow. She should have finished this side by turning the edges under!" lol It honestly looks just fine with the edges raw and the trim covers it up anyway on the front side, and that's what's most important!
I did use one of my special feet for my sewing machine to sew the trim on. It is open on one side so that the balls on the trim had room to go by as I sewed. I didn't use any pins or anything.....I just sewed a long very slowly and adjusted the trim on top of the fabric as I sewed a long. I think that this kind of trim was the easiest, because it was easy to make the sharp curve of the circle with out bunching up or anything like that. So, I would pick out a trim that is very flexible for this project.
Here's the finished fabric piece! You can see a bit of the red fabric showing through the top in this photo. I took some sharp scissors to trim that off as close to the stitching as I could.
Now for the fun part! The circle that fits in the lid....... ;-) I traced around the outside of the metal lid onto red card stock and then used my circle cutter to cut a circle just a little bit smaller than what I had traced. This way I know it will fit inside of the lid. Then, I made another circle but out of white, watercolor paper. I made this circle so that it is about 1/8-1/4 inch smaller than the inside circle of the metal lid. I stamped the image in a chocolate-brown and colored it in with a blender pen and my Stampin' Up! markers and then I sponged red ink around the edges of the circle. I then centered the fabric circle on top of the jar, placed the red circle of card stock inside the lid and then screwed the lid ontop of the jar. Next I adhered the white circle in the center of the jar lid. I wrapped some green, gross-grain ribbon around the lid and adhered it together with some glue. I folded the ribbon over so that I was able to create a small loop of ribbon to hang the tag off of.
For the tag, I cut a rectangle from red card stock and wrote "Apple Butter - made with Honey" on one side of the card stock. Next I cut a piece of green, gross-grain ribbon, attached one end to the tag, slipped the other end through the loop on the lid and then adhered that end to the tag, so that the tag is now attached to the jar. I punched out a big snowflake and added it to the side. Then I punched a small circle, stamped the stocking on it and colored it in and then went around the edge with red ink on a sponge and placed it on top of the snowflake.

And there you have it! A cute and festive jar of preserves! I hope that all of my directions made sense. If you have any questions, please ask! And also please share if you make some of these, because I sure would love to see you're creations!


Thursday, November 26, 2009

Wedding Pillow - Practical Scrappers Challenge

The challenge for this week at Practical Scrappers is sewing. I was going to make something new but with it being Thanksgiving weekend, my time got a little lost doing other things! Then I remembered that I had this pillow that I made years and years ago and I thought that it worked just perfectly for this weeks challenge! The idea is from an old Family Circle or Women's Day magazine. I cut out a big heart shape from a paper sack and used that as a pattern to cut two pieces of fabric. Then, I started sewing on all sorts of goodies to the top piece. Ribbon, lace, buttons, ribbon flowers, etc. I then made a frame from some flat lace to hold the photo. I sewed the front and back together and there ya go! A fun memory pillow! The picture is of me and my husband right after we got married and one of my all-time favorite photos of us. I've had this pillow on my bed for a LONG time! lol We will be celebrating our 18th wedding anniversary this June!

I hope you're all having a wonderful Thanksgiving!


Tuesday, November 24, 2009

Delight in the Day - card - Practial Scrappers

This weeks challenge at Practical Scrappers a sewing. For my card, I cut out several circles of patterned fabric and then used my sewing machine to sew them together in what I can best describe as a wagon wheel spokes. I added a button to the center and use adhesive to attach it to the card base.

I hope you are all having a wonderful day! I am writing out my grocery list right now and then it's off to the store! My mother is driving up and should be here later this afternoon. It's going to be a wonderful and busy week!


Sunday, November 22, 2009

Sweet - layout - Practical Scrappers weekly challenge

The challenge this week at Practical Scrappers is to sew and here is my layout where I used my sewing machine. I went around the edge of the circle paper twice in an uneven pattern. I really love using my sewing machine on scrapping layouts and I really need to do it more! My problem is that I don't have room to keep my sewing machine out in my scrapping area, so once I put it away, I tend to leave it there for awhile. If it was sitting out, I'm sure I'd use it more.

This is my little GG last Christmas. Once she tried a candy cane, she was hooked! I can't believe that it's already almost Christmas-time again! Where did this year go? I'm sure that I won't be able to put candy canes on our Christmas tree this year......I have a feeling that they will start to disappear one by one!

I hope that you all have a wonderful Monday! It's Thanksgiving week! I have so much to be grateful for and so many big dreams for our future that we are talking about..... :-)


Honey-bee card

Here is a card that I had made for last weeks challenge at Practical Scrappers to use acrylic paints. I meant to share it before now, but having the flu last week really threw me off my groove!

I received a special package from my mom a few weeks ago and my goodie was wrapped in some bubble wrap. (It was my favorite vanilla fudge in the whole wide world from Branson!) I had been trying to think of something to do for the acrylic paint challenge and as soon as I saw that bubble wrap, I knew that I had to try using it and paint to make a background for a card or layout. I had heard of people doing it before, but had never tried it myself. Well, it was super easy and so much fun! The first thing I thought of when I looked at the bubble wrap was honey comb, so that's what I decided to do for this card. I'm not sure if anyone else picked up that I was trying to make it look like honey comb, but that's what my muse told me to do so that's what I did. lol

The flower is a wide piece of wire-edged ribbon. I pulled one of the wires to gather the ribbon into a circle and then added a small Prima flower in the center.

I am hoping to take some photos tomorrow of how to do the bubble wrap techinque, so that I can share it here with you all!


Wednesday, November 18, 2009

What a week.....

Wow. This week has been something else. I woke had the stomach flu Saturday night through Sunday and then my little GG started throwing up at 10:30 on Monday night. I stayed up all night with her and didn't get to bed until 5 a.m. on Tuesday. I am so grateful that my husband is able to work from home, because he stayed home on Tuesday, so that I could nap awhile and to help take care of GG. She is just now starting to feel better. I felt so badly for her and even worse because I gave her the germs! I must admit that I am still not feeling great and I haven't been able to eat a meal since Saturday. Actually, the one thing that sounded good to me and the only thing that GG ate today, was some homemade potato soup. I made a batch of it last night and it really hit the spot! It's such a simple recipe, too. I'll have to share it soon. This stuff is really icky and I hope and pray that no one else gets it!

I need to get to work scrapping, too! I have next weeks focus to work on for Practical Scrappers! It's a great one, too and I'm really excited to do a layout for this one!

I hope that you all are all doing well and are staying healthy and warm. It's feeling like winter is coming here in the Heartland. I am totally shocked that next week is Thanksgiving! I have been working on my menu and pulling out some new dessert recipes to try. I will share with you all, if they turn out super yummy!

Monday, November 16, 2009

Love-Doh - layout for Practical Scrappers weekly challenge

Good morning everyone. Wow. I am surprised that I can sit here. Well, I barely am. I woke up at 1:30 a.m. Sunday with the stomach flu and this is the first time that I've been out of bed and sitting up since then. It was awful! lol But, I sure am glad it's over. I just hope and pray that no one else in the house gets it. Especially my little Gracie.

The challenge this week at Practical Scrappers is to use acrylic paint. For this layout I simply dry-brushed some white acrylic paint onto the red card stock. After the paint was dry, I added all of the other elements and there you go!

I would love to write more, but I'm honestly not feeling too well!

Take care!

Friday, November 13, 2009

An awesome list of tutorials.....

I stumbled upon this incredible list of sewing tutorials this morning and I wanted to share it with you. I am in total LOVE with the red, mushroom houses that are in the center photo. I have pretty much decided today that I am going to have to come up with some sort of creative-time schedule. There are just way too many things that I want to do and I'm not able to do any of them because get stuck working on just scrapbooking and do make any time for the other things that I would love to do. Right now, I'm thinking of just alternating days.....scrapbooking on one day, sewing on the next, then scrapbooking, and then sewing.....you get the idea. There are lots of things that fall into that sewing category, too. Clothes sewing for me, clothes sewing for GG, accessories and bags, softies and toys, home decor.....there are so many things that I want to do! I need to schedule my creative time somehow, because my right-sided and easily side-tracked brain isn't letting me get to all of the things that I want to. I'll let you know what I decide to do and I need to decide fast, because my stack of projects that I want to create is just getting bigger and bigger!

Anyway, here's this amazing link!

The Long Thread Top 100 Tutorials of 2008

Talk about lots and lots of super-cute goodies to make! I hope that you find something fun here to make, I know that I sure have!

Take care and happy crafting!

Thursday, November 12, 2009

Pass It On - Card 3


I made this card last week that I shared here and I am putting it up for grabs for this weeks Pass It On. I sure do hope that you comment below, because if you do, you could win this card that you can pass on to someone who needs some TLC!

Please read about the mission of Pass It On Ministry here and be sure to come back here to comment. I will pick a random winner on Friday and send the winner a card as soon as I get their information. So please be sure to check back on Friday or follow me. I sure don't want you to miss out on winning a card!

I hope you all have a wonderful and blessed day!

Tuesday, November 10, 2009

Scraproom Re-Do - organizing by color

Well, I did it. I reorganized all of my scrapping embellishments by color of the weekend. It was a pretty big decision to make, too! I am a creature of habit and I've have things the same way in my scrap area for a long time, so the idea of doing this really freaked me out for a bit! lol The first time I heard of organizing your embellishments by color was by Stacy Julian. She has talked about it in some of her books and on her web site also. I always loved looking at the photos of everything all pretty in their drawers by color. I have always organized my paper by color, but everything else was by type. All the ribbons together, all of the buttons together, flowers together....etc. This was working just fine for me, but I really wanted to try something different. And, after sitting and really think about how I scrap, I actually think what color I want to use, before what type of embellishment. This is funny, too, because I thought I was the other way around. I thought that I said to myself, "I need a button. A red one." But I really think, "I need something red, how about a button?" I think that this is probably the most important thing to think about seriously before deciding to organizing your embellishments this way. If you think, "I need a button" first and then decide on a color, then I wouldn't think about touching your embellies! lol This might really mess your scrap-thinking system. But, if you're feeling a little stale and like you're not using your embellishments as much as you'd like to, then this might be a way to mix things up a bit for you. Either way, I would really sit and think about how you scrap before you consider doing this. It is a huge change! lol

So here is what my scrap area looked like before......
This is my main work area. The counter top is pretty much full of stuff, especially the two, gray drawer units. These units had all of my small embellishments in them organized by type: buttons, ribbon scraps, brads, flowers, etc. These drawers were also my little ones favorite thing to play in! And, another reason why I decided to try this way or organizing honestly. She likes to work beside me while standing on a stool and she can easily reach these drawers and pull things out. This was really starting to drive me crazy! lol More so because she was putting things back in different drawers and mixing everything up. So, I knew that these drawers had to go, because she's only going to get bigger and able to reach more drawers! lol The two, small green drawer units hold my square-punched photos and the white drawers are my category drawers. Both of these are for my Library Of Memories system of organizing photos as taught by Stacy Julian and discussed in her book, Photo Freedom. I highly recommend this book if you're looking for a change in how you scrapbook photos! It totally helped me break out of the "I can only scrap chronologically" way of mind and threw me into the "I can scrap whatever I want to, whenever I want to!" scrapping freedom! No more, "I'll never get caught up.".....sorry, it's easy for me to get excited about that system. Oh how I wish and dream that I could afford to take her on-line class, but the book is awesome, too!
I have a 2-door, tall pantry that I keep my drawer units in. The unit on the left was pretty much a mess and waste of space. The top, three drawers were full of ribbon. Some were still on their rolls and others were wrapped around plastic, floss keepers. The other three drawers were completely unorganized and just full of stuff that needed to be sorted. This was really a waste of good organizing space! The unit on the left is actually two, 6 drawer units on top of each other. These held all of my paper scraps, organized by color: red, yellow/orange, green, blue, pink, purple, brown, white, black. Then, a drawer with specility papers like vellum and mulberry paper, one with scraps of only Chatterbox patterned papers (I had aquired over 300 pieces of Chatterbox paper at a garage sale for a steal and thought I should keep all of the scrap together, so that I could use them better....I was wrong, I never remembered they were there!). On top of these units is my one, true scrapbooking shame......I'm hanging my head in shame right now as I type.....those tall stacks of paper are layouts. Completed layouts that are waiting to be put into scrapbooks. Isn't that terrible????? I don't even want to know how many are sitting there. How can anyone enjoy them all piled up there, shoved in a cabinet? Oh, woe is me.......I think that should be my next project. Putting them into albums..........

After about two days of working, I was finished.......here's how it looks now:

The unit on the left now has embellishments in it, all organized by color. I had to use two drawers in the unit on the right for embellishments also - for white/black and then metallic. The pink/purple drawer is pretty full, but I'm going to try to keep those two colors together, because I don't have any more drawers that I can use! The unit on the right still has all scraps, organized by color and a drawer for specialty paper.

Here is a peek inside some of the drawers:
I used some of the little drawers from the gray unit to help keep some things organized together, like the ribbon, the rhinestones and glitter, and then a larger drawer for paper pieces, chip board, anything like that. I have the flowers in a zip-loc baggie as well as scraps of ribbon and fabric in a baggie. I have been saving these round, metal tins for years. One of the teachers at the school I used to work at was throwing them away and I took them, because I knew that I'd be able to use them for something! You can see them the easiest in the green and pink drawer (click on the photo to see it bigger). I have two in each color drawer. One has buttons and the other brads and eyelets. I punched out a flower in coordinating paper to put on top of each tin. I also did this for the front of each drawer in the units.

Here is the biggest change in my scrap area. My counter top. Getting rid of those two, gray units really freed up a lot of space on my counter top. I added a little shelf (a piece of scrap wood sitting on top of two, recycled spaghetti jars!) because I wanted to keep the two, green units right there and to put any small odds and ends. I have a jar full of black buttons and a jar of white buttons, because I had too many to keep in my color drawers. I also have my two Design with.... calendars from Autumn Leaves there, but I might move those because I never really look at them like I should. The white basket has silly odds and ends in it. Movie tickets, labels, card board coffee sleeves, things like that. It's another idea from Stacy Julian's Photo Freedom book. It's just fun stuff that you can sift through and add to a layout. Little things from every day life go in there. This can easily be moved to free up more space, if I need it. The red and white polka dot pot is my little trash bin and the square basket next to it has photos in it that I am planning on scrapping soon. Then I have my tool turn-around that I use to hold my pens, pencils, scissors, paint brushes, erasers, glue tubes, etc. The basket next to the lamp is full of small stamps that can be used on envelopes and the back of my cards and layouts: "hand stamped by" and "scrapbook layout by"....things like that. :-)

I hope you enjoyed seeing how I have reorganized my scrap area. I honesltly haven't been able to do one bit of scrapping since I did all of this work! The rest of my weekend was very full and I just haven't had the time to play in there at all and to try out my new system. I must say that when I open up one of my color drawers, my severely right-sided brain gets so happy! lol I can't wait to put it to the test and see if this helps me use more of my embellishments that get so easily forgotten about. I also had a ton of stickers and what-not just lying around. All of those have been put into plastic page protectors with pockets and into a binder with my alphabets and other stickers.

I guess I should say that I do not have any of my stickers in my color drawers. I decided to keep them organized together. Right now, I have a binder full of alphabets that are in page protectors and organized by color and a Crop-In-Style Paper/Sticker Binder full of stickers that are organized by theme - love, flower, sports, birthday, Christmas, Halloween, spring, etc...... I don't know if I will ever add all of those to my color drawers. I do like having them by theme and I think that I'll use them the most if I keep them organized that way.

Well, I have rambled on long enough about this! If you have photos of your color drawers on your blog or if you decide to do this, please share because I would love to see what you have done!

Take care and I hope you have a wonderful day........and hopefully are able to do something creative!


Easy-Peasy Ribbon Flowers - tutorial

It has been a pretty crazy and busy week for me. I have actually gotten a lot done in my scrapping area (no layouts but lots of organizing!) and I hope to share with you all what I've been up to soon! But for now, I am going to share with you how to make some easy-peasy ribbon flowers. I took these photos last week while making a flower for a layout and I'm finally able to show you how to make them. They are super cute and I hope you enjoy learning how to make them! I've made them from several different types and sizes of ribbon and they have always turned out super cute. So far, I've used them on my "Silly" layout and my "Thanks from the Heart" card.

So here we go!!!!

The first thing you need to do is pick out your ribbon and cut it. I honestly haven't been measuring them as I make them. I've just kind of been cutting the ribbon to the size that "felt" right. I know that doesn't help you much, but I'll try to explain. lol The thicker the ribbon, bigger the flower will be so you can cut the ribbon longer. Thin ribbon will make a small flower, so you need to cut it a lot smaller, like 2 inches or so. I used a 1-inch thick, organdy-type ribbon above. It's a thin material, so I knew it would gather tighter and make a nice, frilly flower so I cut the ribbon around 5 inches long. You just need to play with it and see how it's going to work, if you're not sure. You can even stitch and gather it (without cutting the ribbon) to see how it's going to look first.
With a nice, sharp needle and matching thread, run a straight sewing stitch all the way across one edge of the ribbon. For my thread, I cut a nice long piece of thread, run one end through the needle, fold the thread in half, and tie the knot about 4 inches from the end. You want the thread double, so it's strong enough to handle your pulling on it later and a long tail at the end of the knot. That way you will have extra thread to hold on to and help gather the ribbon. When you're done sewing, it will look like this:
Now pick up your ribbon and start pushing the ribbon in on both sides until you can bring the two ends together and tie once. Don't tie it in a complete knot yet! Pull the ends of the thread tightly until the ribbon has gathered together tightly in the center and has made a flower. Now you can tie the thread into a knot....or two, or three. lol I usually make a few knots, just in case. lol In the picture below, this is what it looks like after I tied my first "knot" and before I pulled the two threads to tighten the ribbon into a flower. Once you pull the two threads, the center will close of your flower. If your ribbon is thick, it won't close as tightly.
Now take a good look at your flower. See if you can tell where the two ends of the ribbon are. Sometimes the ribbon folds over it's self and hides the ends and looks just fine. Other times, you can easily tell where the ends of the ribbon are and I think it looks a lot better if you can't see the ends. lol So, with this thin ribbon, I was able to just add some Mono-Adhesive to the ends, just a bit, and then pinch the ends together to seal it up. It works great on thin, organdy ribbons. For thick ribbon, I use the same thread that I gathered the ribbon up with and run a straight-stitch down the ribbon and back up to the center to sew those two ends together. I had to do this for the flowers on my "Thanks from the Heart" card, even on those little flowers. Now you can cut off those two threads. Here's a finished ribbon flower!
Now here's the fun part where you can really play! You can add whatever you want to your little flower or leave it like it is. Here are some examples as I was trying to decide what to add to my flower for my "Silly" layout (I ended up picking the button one! lol) :
You could even add another ribbon flower that's smaller....that would look cute, too!

I hope this made sense. This is really the first tutorial that I've done and I tend to get a little wordy. lol If you have any questions, please ask and I'll help as much as I can! I have some other fun, flower ideas to share with you soon! I'd also love to see any projects that you do using these easy-peasy flowers, so please share here!

Take care everyone and I hope you all have a wonderful day!

Sunday, November 8, 2009

Birthday Card - Practical Scrappers Weekly Challenge


This was a fun card to make! I just recently bought a couple of Cuttlebug embossing folders and I hadn't really played with them yet. This challenge was a perfect chance for me to give them a whirl!!! I ran the green white-core card stock through the embossing folder and then I used a light-grain sand paper to lightly rub over the top of the embossed paper and along the edges as well. I free-hand-cut the cupcake pieces. The bottom part was put through my paper crimper (talk about rubbing the dust of a severly neglected scrapping tool!!!) The candles are made from pieces of ribbon and the flames were made with a tear-drop punch and rubbed with sand paper also. I also rubbed some darker yellow around the edge of the "frosting" and the edge of the orange matting paper.

This was a really fun technique to do and I can't wait to use it on some more white-core card stock!

Wishing you all a very happy Monday!


Silly - layout - Practical Scrappers Weekly Challenge

Here is a layout that I did for this weeks challenge at Practical Scrappers! The challenge this week is to use white-core card stock. For this layout, I punched out three different sized hearts from three colors of white-core card stock and then I used a very rough-grain sand paper to rough up the edges and on top a bit. I added some ribbon and lace and also a paper doily. I made that blue, ribbon flower and I took pictures so that I could share with you how to make them!


Thursday, November 5, 2009

Video from Detroit about Noah.....

Here is a video from a local new station about 5-year old Noah and his family...........

http://www.clickondetroit.com/video/21525126/index.html


A Christmas card for Noah....


This heartbreaking request was posted on Paper Crafts Magazine's Facebook page and I wanted to share it here with you all. Please follow this link to read about Noah and his family's request for people to send him Christmas Cards right now. He is at home on Hospice care fighting his last battle with cancer. He is only 5 years old and his favorite holiday is Christmas, so his family is celebrating Christmas this weekend. I know my card might not make it there in time for their special Christmas, but even if it's a day or so late, it will still be special to him! So, please take a few minutes to send little Noah a Christmas card. Even though I felt like crying the entire time I was making his card, I was blessed with the comfort and grace of God. This story makes my heart hurt. May we all say some extra prayers for Noah and his family. And, be sure to hug your loved ones extra hard today! We are all so blessed.......

Here is the address to send Noah's card to:

Noah Biorkman
c/o 99.5 WYCD
2201 Woodward Heights Blvd.
Ferndale, MI 48220-1511


Tuesday, November 3, 2009

Scrapbooking Idea/Journal Jar

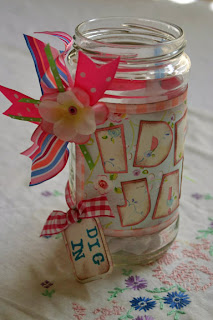
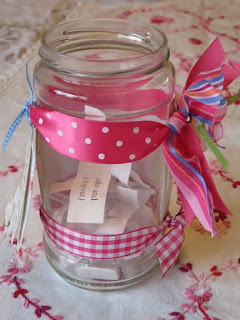
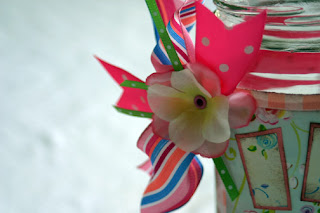
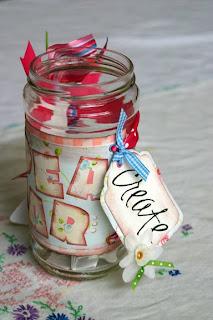
Here is a project that uses lots of different ribbons! I made this idea/journal jar awhile ago and thought that I would share it here since the challenge this week at Practical Scrappers is to use at least THREE different ribbons on a project. This is also a great way to recycle a jar.....I think this used to be a salsa jar. I wrapped this jar a little differently. Instead of totally wrapping the jar with paper, I made the paper "label" part only big enough to cover half of the jar. I matted a piece of patterned paper on it and then added the letters that I had cut out using an old, plastic letter template (I LOVE those things! lol Old-school scrapping at it's best!) All of the paper pieces/letters were rubbed with a brown ink pad to shabby them up a bit. Then, I placed an eyelet about an inch in on each corner. I threaded a piece of ribbon through one eyelet and then tied it across through the next. I did this so that there are two ribbons that wrap across the back of the jar and hold the paper "label" in place. It's not held on to the jar with any adhesive. The two tags and the flower/ribbon cluster are all tied onto or adhered the ribbon that is holding the "label" onto the jar.
Inside of the jars are little strips of paper. This is where you can decide what type of ideas you want to keep inside your pretty jar. You can put techniques to use, ideas to scrap, journaling starter ideas, anything you want! These ideas can be applied towards scrapbooking layouts or cards. Then, when you're stumped on what to scrapbook next, you can grab a slip of paper from your idea jar and see if that gets your creativity going!
Here are some ideas to keep inside your jar that I have collected from various places, including a lot from Bridge that she shared at the Yahoo! group I'm in called ScrapFromYourStash (it's a great group to help you use up your stash!!!!). This list is LONG! lol And, there might be some doubles on things.....it was hard for me to remember what I had and hadn't already typed out. lol I would suggest that you copy this list and paste it into a word document and enlarge the font to a size that's comfortable for you to read. Make sure that there is a space to two inbetween each sentence, so that you have room to cut them into strips. Print out the list and then cut into strips, fold them up and put them in your jar.
Scrap Jar Idea Starters:
  • Use fabric or fabric-styled paper
  • Make a card
  • Let something hang off the edge of your page (tab, ribbon, etc.) outside the page protector
  • Use a map on your layout
  • Cover a page element in Utlra-Thick Embossin Enamel or embossing powder
  • Use a stamp on your layout
  • Add flowers to your layout - silk, Prima, etc.
  • Journal in a shape - around a photo, inside a shape, in a shape, etc.
  • Use acrylic paint
  • Sew on your layout
  • Use a monogram larger than two inches on your layout
  • Make a heritage layout - if you don't have any photos, make the layout based on a memory about someone from your heritage
  • Use border punches
  • Make a layout with no photos
  • Tear the paper on your layout
  • Alter something - book, cd, tin, box, etc
  • Use your deco scissors
  • Use sandpaper or the edge of your scissors to distress something on your layout
  • Use a sketch
  • Scrapflift a layout from the web, idea book or magazine
  • Make a layout using scraps from your stash
  • Use a pre-made layout - i.e. from a swap, make & tak class, or store-bought layout.
  • Use photo corners
  • Dry emboss an element
  • Dangle something from the title
  • Mix template/die-cut letters for the title
  • Decorate the four corners of layout
  • Journal on a photo mat
  • Weave a fiber behind the title or picture
  • Use a photo to make letters using a template/die-cutter
  • Use a photo for a mat
  • Cut a title from a cursive font
  • Make a monochromatic layout
  • Use Magic Mesh
  • Chalk edges of a torn phot mat
  • Decorate one side of photo mat wtih eyelets
  • Dangle tags from photo mat
  • Cut graphics from pattern paper to use as emellishment
  • Use nothing but card stock
  • Use nothing but printed paper
  • Sew a title
  • Use your favorite shirt as inspiration
  • Turn on the TV, use the first words you hear from TV on your layout
  • Usu your favorite knick-knack as innspiration
  • Hand write your journaling
  • Journal using a list
  • Journal two points of view the the picture in your layou
  • Use pop-up dots
  • Make a shaker box
  • Use at least three photos on a page
  • Use ribbon
  • Use colored pencils on your title
  • Journal on vellum over a photo
  • Use buttons
  • Make embellishments wtih punches
  • Mix patterned papers
  • Use "wood"-looking pattern papers
  • Put your title down the side of the page
  • Journal under a "lift-up" photo
  • Use a shaker box in your title
  • Roll the edges of the paper
  • Use fabric flowers - easy to make by cutting circles of fabric and layer on top of each other, secure stacked circles with a brad.
  • Use teeny-tiny beads
  • Tear the edges of a picture
  • Print a picture on watercolor paper, tear and chalk edges
  • Print photo on vellum
  • Put title letters on individual tags
  • Use a one-word adjective for the title that describes the person in a picture for the title
  • Write a letter to the person in the layout
  • Pick key words in your journaling to highlight with borders, a larger font, or with color
  • Color-block a background
  • Embellish your page with a paper doll
  • Dot the "i"s in your title with an embellihsment
  • Use white as your background
  • Use stickers in a creative way
  • Use a die-cut in a creative way
  • Use a pre-made frame
  • Use a sticker border
  • Use a stamp you bought ages ago and haven't ever used yet
  • Use the last thing you bought
  • Use something you got in a swap
  • Use the name of a TV show for a title
  • Use the name of a song for a title
  • Use the name of a book for a title
  • Use the word "love" in the title
  • Use your computer to print out a title
  • Use letter stickers for your title
  • Use a hand-written title
  • Use die-cut/template cut letters for your title
  • Use the title only to explain your pictures - no journaling
  • Use a pre-made title
  • Use wire, raffia, or string
  • Use plaid paper
  • Use all pastel-colored paper
  • Use a black for your background - solid or printed paper
  • Use crumpled paper
  • Use all bright colors
  • Use metallic paper
  • Use suede paper
  • Use three different patterned papers in the same layout
  • Use red, white and blue on your layout
  • Use vellum
  • Use at least three shades of the SAME color
  • Convert an 8.5x11-inch sketch to 12x12 and make layout
  • Do a black and white layout
  • Use embossed paper
  • Use glittered paper
  • Use mulberry paper
  • Emboss your own background paper
  • Scraplift one of your own favorite layouts
  • Scrap a holiday in non-traditional colors
  • Scrap any celebration
  • Scrap a family tradition
  • Scrap an event that includes some sort of food (picnic, Thanksgviging, restaurant, etc.)
  • Scrap a sports event or a game
  • Do a layout that includes toys in some way
  • Do an animal layout - zoo, pets, etc.
  • Do a Spring layout
  • Do a Summer layout
  • Do an Autumn layout
  • Do a Winter layout
  • Do a water-themed layout - pool, beach, bathtub, rain, etc.
  • Use a prayer
  • Use a Bible verse
  • Use a quote
  • Use a song title
  • Use a poem
  • Do a mosaic on your layout
  • Do a page about YOU!
  • Do a Patriotic page
  • Scrap a current event
  • Do a vacation layout
  • Do a layout about a family favorite/traditional recipe
  • Scrap a special accomplishment by your or someone in your family
  • Do an "It's Broken" layout - toy, car, arm/leg, etc.
  • Do a "Like Father, Like Son" or "Like Mother, Like Daughter" (or any family member- grandma, grandpa, aunt, uncle, sister, brother, etc.)
  • Do a layout about your house
  • Do a layout about your career - even if your a SAHM! That's the most important career ever!
  • Do a layout about a school activity
  • Do a layout about a church activity
  • Do a BEFORE and AFTER layout - diet, pregnancy, dirty to clean, home improvement
  • Do a color-blocking layout
  • Do a nautical-themed layout
  • Do a sand layout - either in color, texture or content
  • Add an element that moves onto your page - pop-up journal page, something that pulls, etc.
  • Put memorabilia on a page
  • Make a quilt block from pattern paper and use on your page
  • Make a pocket page
  • Do a page about your garden
  • Use a paper-folded embelishment on your page
  • Make a scene with stickers
  • Use stickers for the border
  • Make and use a journaling square
  • Use a ready-made journaling square
  • Use computer-generated journaling
  • Use something from nature
  • Use watercolor pencils
  • Use colored pencils
  • Use markers
  • Use glitter or a glitter pen
  • Use Radiant Pearls
  • Use Pearl-Ex
  • Use speciality paints/ink - Smooches, etc.
  • Use beads
  • Make and use a paper piecing
  • Make and use an embelished die-cut, or use store-bought
  • Use ladybug theme
  • Use pressed flowers or leave
  • Use a paper-clips
  • Use brads
  • Use staples
  • Use stars
  • Use a ready-made frame
  • Use tag art
  • Use ribbon
  • Do quilling
  • Pen-stitch a border or around a photo
  • Use your die-cutting machine
  • Use chalk
  • Use eyelets
  • Use shaped eyelets
  • Use colored/specality brads
  • Use a paper crimper
  • Use a tool you have not used in over a year
  • Use a black and white photo
  • Use a 5x7 or larger photo
  • Crop a picture into a circle
You can also add journaling starters if you want. There are several places online that have lists of journaling prompts. If you google them, you will find several, so I'm not going to write any of them out here. It wasn't as easy to find a list of scrapping idea starters! lol You can easily add your own ideas, too, especially any tools that aren't listed above and even products or prdocut lines that you might have a lot of in your stash.

If you make an Scrapping Idea Jar, please let me know and share your link! I would just love to see what you create! Or, if you think of some idea starters that aren't listed above, please let me know so that I can add them. :-)

I hope you all have a wonderful and blessed day!
di

(I'm not sure where my pretty graphic went! lol I might have erased it! oops!)

Monday, November 2, 2009

Thanks from the Heart- card- Practical Scrappers Weekly Challenge


I am so happy to say that I was able to play in my scrap area for awhile, with little GG right by my side, and I was able to get a card done! This one is for this weeks challenge at Practical Scrappers to use at least THREE kinds of ribbon. I saw a ribbon flower somewhere and decided that they would be fun to make and put on a card and I just so happened to have this old Stampin' Up! stamp set that worked perfectly for my idea! I also added some light blue glitter to make it look a little more like water......and well, quite honestly because I bought a few bottles of glitter a week or so ago and I am finding myself having to add glitter to each project now! lol The flowers were very easy to make and I should have taken photos as I made them. Maybe I can do that later, if you all would like to know how to make them. ;-)

Take care and I hope you have a wonderful and crafty day!